Thursday, November 24, 2011

Cranberry Sauce... Made Fresh!

Happy Thanksgiving!  Today I am sharing a simple thing that I just happen to be grateful for... a recipe for cranberry sauce made from three easy ingredients... so delicious and so simple, you will never buy a can of the tin flavored variety ever again!  Maybe you're like me, and think you don't like cranberry sauce because all you have ever tried is the canned kind.  Before you go jumping to conclusions, try this one!

All you need is a bag of cranberries, one cup of sugar, and one cup of orange juice!


First, pick out and discard any wrinkly or icky berries you find.


Next, rinse the berries and set them aside.


Combine the one cup of sugar and one cup of orange juice in a saucepan over medium heat.  Heat the juice and sugar to boiling, stirring occasionally.  Continue boiling 5 minutes to assure the sugar is completely melted, stirring occasionally.


Add the cranberries (whoops, I forgot to take a picture of this step... total amateur) and heat back to boiling stirring occasionally.  Put a lid on the saucepan and continue boiling about 5 minutes longer, still stirring occasionally.  You will hear the cranberries popping!

Remove the saucepan from heat and give it another good stir, allow it to cool for about 20 minutes.  Pour the cranberry sauce into a bowl or container and allow to cool completely before refrigerating.

You're finished product is a delicious sweet and tangy burst of color for your Thanksgiving meal.


Orange Cranberry Sauce
Serves 12


4 cups fresh or frozen cranberries (1 lb bag)
1 cup granulated sugar (you can substitute all or some brown sugar)
1 cup orange juice

Rinse the cranberries (even if they are frozen) in a strainer with cool water, and remove any stems and blemished berries.  In a large saucepan, over medium heat, heat the juice and sugar to boiling stirring occasionally.  Continue boiling 5 minutes longer to assure the sugar is completely dissolved, stirring occasionally.

Add the cranberries and heat back to boiling over medium heat, stirring occasionally.  Put a lid on the saucepan and continue to boil about 5 min longer, still stirring occasionally.  You will hear your cranberries popping!  Remove saucepan from heat, give it a good stir, and allow to cool for about 20 minutes.  Pour the cranberry sauce into a bowl or container and allow to cool completely before refrigerating

Saturday, November 19, 2011

My Version of the Fabric Covered Jewelry Hanger

My neighbor saw a jewelry holder I had pinned on pinterest, and wanted to know if I could make a couple to match her daughter's room.  The photo was from etsy (see here)... and didn't exactly include a tutorial.  I assumed the fabric had been wrapped around boards, but on a visit to Micheals I saw a package of cute chunky canvases.  They were the perfect size, and the perfect price after using a 40% off coupon!


For this project you only need a couple items, pictured below.  A drill, a staple gun, hooks, ruler and pencil.

First, mark with a pencil where you want your hooks to be.  I measured this out with the ruler.  You can also put hooks on the sides or front of the jewelry holder, I decided to stick with the original picture since I was making it for a friend, but I think hooks on the front and sides would be cute too!  Drill your holes.


Next decide what portion of the fabric you want to show on the front, make sure you leave enough to wrap around the sides... and then cut your fabric.


Next comes the staple gun part!  The most important thing is to stretch the fabric TIGHT as you staple. Start on the middle of one side, then stretch and staple directly accross from it.  Work your way out to the edge, pulling the fabric tight between each staple.  Make the corners look pretty from the front and sides, then pull them around and staple on the back.


Next screw in your hooks!  I used a straight pin to poke through the fabric to find the holes.


I should probably ask my neighbor for a picture of them hanging in the room!  Such a simple project.
I also attached a sawtooth hanger on the back of each one.

Friday, November 18, 2011

Short Sleeve Tunic

 
from this
 
to this

Since the spring, I have been looking for a cute tunic-shape blouse made of cool, light cotton fabric and most importantly... with short sleeves.  I can't believe how impossible it has been to find one!  Maybe there is some set in stone fashion rule that all tunics must have long sleeves, or no sleeve at all?  Being completely unfashionable myself I just wouldn't know.

The closest options I have found have been cinched around the bottom and billowy around the middle... or have a tie in the back, instantly transforming it into maternity wear.  Some gals might look great in one of these two styles, but not me!  Yikes!  The only other option is sleeveless tunic styles layered on top of a tee which is what I had finally resorted to.

I certainly can't wear a long sleeve anything in Arizona unless it is easily removable.  Even in the winter time, I only wear short sleeves with a jacket.  I had essentially given up the search, although I kept my eyes peeled of course.  One day, as I was preparing a pile for Goodwill, and noticed two shirts... they were tunic style, with 3/4 length sleeves, and had originally been purchased at Goodwill for the Pioneer Trek.  I had an idea.  If the only thing preventing me from wearing these shirts is the sleeve length... maybe I could shorten the sleeves using my limited sewing skills.  And maybe, I thought, if the process goes well... I could find other cute tunic tops and shorten their sleeves as well!  Considering the materials were essentially free and available, I was eager to try the tunic transformation and test my theory!
Tan shirt
Gray shirt
I knew I wanted a cap sleeve, so I went to my closet and found a shirt with a great sleeve length.  Next, I lined up the seams around the shoulders of the two shirts and cut the longer sleeves off leaving some extra fabric for a hem.


After chopping off both sleeves, I folded the shirt in half and compared sleeve lengths.  Wouldn't you know it, one was a little longer than the other.  No big deal, I just trimmed it to be equal in size.


Next came the ironing and then pinning of the hem.  Had I been thinking ahead, I would have folded the hem over twice before stitching... but because of the stiff fabric it doesn't seem to matter so far.  When I sewed the gray shirt afterward, I folded the hem over twice to hide the raw edge.  See, I told you my sewing skills and knowledge are limited!  The Coke Zero really helps with the creative process btw.

And now for the final reveal of both shirts!  I happen to like them both much better now.  I am hoping to find more long sleeve shirts to alter!


Monday, November 7, 2011

Parable of the Purse Young Women in Excellence

Quentin L. Cook gave a conference talk in April 2011 which has become known as the Parable of the Purse.  This talk was the inspiration for our Young Women in Excellence program, "We Believe in the "Purse"uit of Excellence..."

The invitations were created in a scrapbook program to look like a purse, and then printed off 4x6 at Costco.  The corners were slightly trimmed to give it a softer look, and then a ribbon was simply stapled to the top for the handle.

Corners Rounded


Ribbon Handle Stapled


Finished!

The program touched on the different stages of life and related to the type of purse a girl would be carrying at the time.  It was written by our Stake YW President, and included musical presentations begining with a live performance of "I'm trying to be like Jesus", and ending with "I Know That My Redeemer Lives."  In between these two songs were monologues, and Youtube video clips of Where You Stand, I Love To See The Temple, and No Greater Work.  Then The video of The Parable of the Purse was shown. 

The cupcake topper printables were found here at The Lovely Paper Shop blog.
I didn't make the cupcake stands, they were made from styrofoam blocks and ribbons and papers... sorry I don' have specifics on those.


The stage set up.


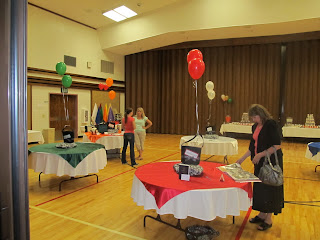
Display tables for each ward to fill with projects.


A pop of color on top of the piano, tissue paper wadded inside wire balls on candlesticks.


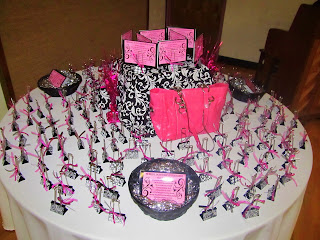
The handouts were binder clips covered with scrapbook paper and some ribbon ties added to the "handle" to look like a little purse.  These can sit on the young woman's nightstand holding her current personal progress goal.  There was also a handout with a quote from Gordon B. Hinckley,

"Jesus said, 'Be ye therefore perfect, even as your Father which is in heaven is perfect' (Matt 5:48)"  That is the great crowning example of excellence.  May each of us have a rich and wonderful life moving in that direction.  We will not become perfect in a day or a month or a year.  We will not accomplish it in a lifetime, but we can keep trying, starting with our more obvoius weaknesses and gradually converting them to strengths as we go forward with our lives."