Sunday, September 25, 2011

Bling That Zipper Binder!

As the school year approached, I was informed that Bailey needed a new zipper binder because the one she used last year was broken.  Tight on cash for school supplies, I cringed at the thought of needing to spend yet another 20 bucks... but decided that since the other two monkeys were getting new backpacks, in the grand scheme of things, it would be a fair deal.

Fast forward a couple months to a room cleaning/overhaul... I find her old binder shoved into the top of the trash can.  Well, being the resourceful trash-digging type, I snatch it out just to make sure nothing valuable was still inside.  What do I find?  A handful of never-been-used lined paper, a perfectly good 3-ring zipper pouch for pencils and such, and what appears to be a fully functional (but not beautiful) binder.

"Um, I thought you said your binder was broken," I say in confusion... turns out the only thing broken about it was the zipper on the outside pocket which really doesn't have much use at all since you can barely squeeze your fingers inside.  Also, there were complaints that a "friend' had drawn doodles on the binder which made it an unsightly embarrassment.

I decided to try to cover the flaws... and create a "back-up binder" in the event that sometime in the near future her currently used binder became broken or doodle vandalized.

First, I used a black Sharpie to cover most of the evidence of doodle marks.  This worked quite well, except for the problem which became apparent after handling the binder for a while... my finger tips began to show signs of staining.  Ooops.  I applied a coat of Mod Podge over the Sharpie.  For now, that seems to be working.  Here is a picture of the binder after Sharpie application:


Next step, I thought it might be fun to add a little ruffle along under the zipper, leaving a little exposed zipper detail which is kind of still in style, right?  I'm sure there are lots of great ruffle tutorials out there... I basically just took a long strip of scrap fabric I had, and ironed over a little edge for a hem.  No measuring or pinning or anything like that... if a sewing project takes that much precision, then I probably don't have the skills or patience to  complete it.  As a rule, I only sew crafts and costumes... neither of which involve durability or much accuracy.


Next step, sew along the folded edge to make a hem.  I'm just going to make a little confession here... as I am typing the word hem, I am questioning whether that is actually even the correct term.  Obviously I am no seamstress, and obviously I have an ugly ironing borad.


Next, thanks to my friend Trish who taught me how to make a ruffle a while back... on the opposite side of the fabric strip I sewed two long parallel stitches down the edge being careful not to cross them... and not back stitching them on either start or finish:


Next is the fun part, you carefully pull on the threads and scrunch up the fabric into a ruffle.


Next was the tricky part, (only tricky because there wasn't much room to get the pins stuck in) find the middle of the ruffle and the middle of the binder, start there and begin pinning outward, the ruffle into the zipper pocket, and then hand stitch it on.


Once the ruffle is sewn on, all that's left is to cover up the weird red insignia with a flower.  Fold a long strip of fabric in half and sew edges together to create a long thin strip with one finished edge, cut a circle out of felt, and sew the long strip into a messy spiral... starting on the outside and working inward.  cut off any extra fabric in the middle, and adhere a gem or button or whatever center you choose.  E600 glue works well to glue on the bling, and affix the flower to the binder.


I think Berkley likes it more than Bailey does, but a zipper binder isn't very conducive to elementary school.  Recycling is fun and free.  I love free.

Monday, September 12, 2011

What do you have hanging in your tree???

If you've been to my house in the last few months, surely you've questioned the dangling CD's in my pomegranate tree.  Some have been so brave as to inquire about the odd trinket display, but most have probably just silently wondered about my taste and/or tolerance for such oddities.  After all, if you didn't ask me WHY I had a tree decorated with CD's... one might naturally assume that I thought it was a pretty and sparkly addition to the backyard.  Perhaps a product of some child's creativity?  Or, that I've taken recycling too far?  I can only guess what has gone through peoples minds, but I know I haven't explained the monstrosity to every visitor.  Truth is, I hardly notice the sparkling circles at this point.


You see, every year we hope for some edible pomegranates to be produced off that tree.  Every year, more red round fruits are produced, and every year each one is destroyed with a hole created by birds.  Lots of birds with strong beaks who are beckoned to my backyard by my neighbors tempting display of various bird feeders.  There they sit, side by side... a smorgasbord of bird seed possibilities, and my pomegranate tree loaded with tempting red globes filled with deliciousness.


Can you blame me for attempting to scare the birds off with laser beam prism light flashes?  When I read the harmless and chemical free anecdote online, I hoped it would be the answer to our pomegranate dreams... and a tree full of pomegranates would be well worth the humiliation of what others might think of my decorative choices.  I am sad to report that my not yet ripe pomegranates are beginning to get holes in them.  Oh the agony of defeat.


Does anyone have any other ideas?  Help!  I'm desperate!  Also, I just wanted to say I really do love the birds that the bird feeders bring, I just want to eat pomegranates and enjoy the birds too.  Is that too much to ask?  In the couple short minutes that it took me to snap these pictures, I saw three hummingbirds!  Three!  How can I possibly complain about hummingbirds and songbirds dancing and singing in my backyard? 

Also, while examining my newly uploaded pomegranate photos, a certain little something caught my eye in my neighbor's backyard... heres a magnified view, look closely:


I guess my CD's aren't the only white trash decor in the neighborhood!  Hahahahaaaa!  Cactus in a TOILET?  Wow.  Just Wow.

Friday, September 2, 2011

fun way to organize!

Now I understand why Amazon offers the "Amazon Mom" membership!  Eventually a smitten member, like myself, will not need to spend $25 a month in the baby store, but out of desperation at the thought of loosing the free prime shipping privileges, one will search online for hours to find something, ANYTHING in the qualified category to buy.  That just happens to be how I discovered this cleverly designed catch-all.  I intended to install the funkily named "Boon Stash" near Berkley's desk for art and school supplies, but when I pulled it out of the packaging, I realized it could help me unclutter my bathroom counter and streamline my morning routine.  I love it so far!  I just might be buying another for Berkley's desk this month... have I mentioned I love free prime shipping?


You can find this item here in several different colors.  If you don't see the color you're looking for, do a search because I don't think they are all listed at this link.

Wednesday, August 31, 2011

Giant Nail Polish

If you've ever wanted a Giant Nail Polish all for your own... I have the tutorial for you!  This particular model was actually used as a prop in a skit, not as a shelf ornament...


What is a girl to do, when given such an odd prop assignment?  Search online of course!  After quite a bit of looking, I came up empty handed... I had ventured into uncharted territory.  The next couple days were spent waiting for inspiration to hit me.  I studied the shape of regular sized nail polish bottles and realized there were many shape possibilities.  That meant keeping my eyes peeled for the least expensive option to present itself.  What better place to be inspired by over sized containers?  Costco of course...


After purchasing my Cheese Balls, the next step was convincing my three children and various neighborhood friends to consume the entire mass of orange puffy goodness in the shortest amount of time possible.  Ha!  Actually that part was easy, of course each child took their responsibility to eat Cheese Balls very seriously.

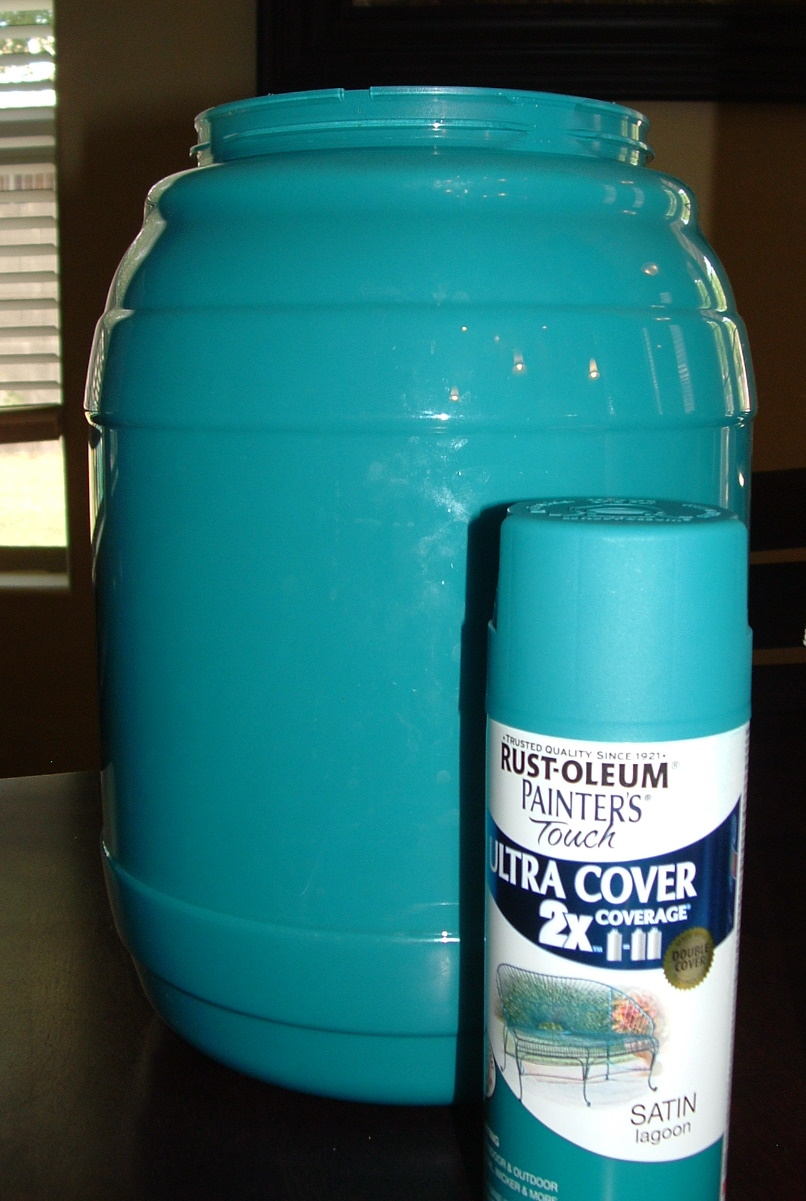
Along with the test of cheesey consumption endurance came the part of picking out a fabulous paint color to match the color scheme of the girls camp skit.  This is actually more difficult than you'd think, as spray paint colors are fewer in shades and hues than regular acrylic or latex paint.  After several stores I found a great color.  After washing the inside of the container, I tested the spray paint with one hand, while crossing my fingers with the other hand... in hopes that the color would appear as vibrant and dense as a bottle of nail polish would.  Success!


Next I constructed a tall black lid out of poster board, staples and glue and attached it to the Cheese Balls original purple lid with hot glue.


Next, I created a polish wand out of a paper towel tube and an old foam brush, and painted them black.


Yay!  Almost done... just a little teal colored paint added to the polish wand, and then attach it to the purple lid.


All finished!  It looked quite authentic, up close even... so it was perfect on stage!  Can you believe though, that one girl came up to me afterwards because she had bet her friend that it had been made from a Cheese Ball container?  She must eat a lot of Cheese Balls!